





-1782988482.webp)
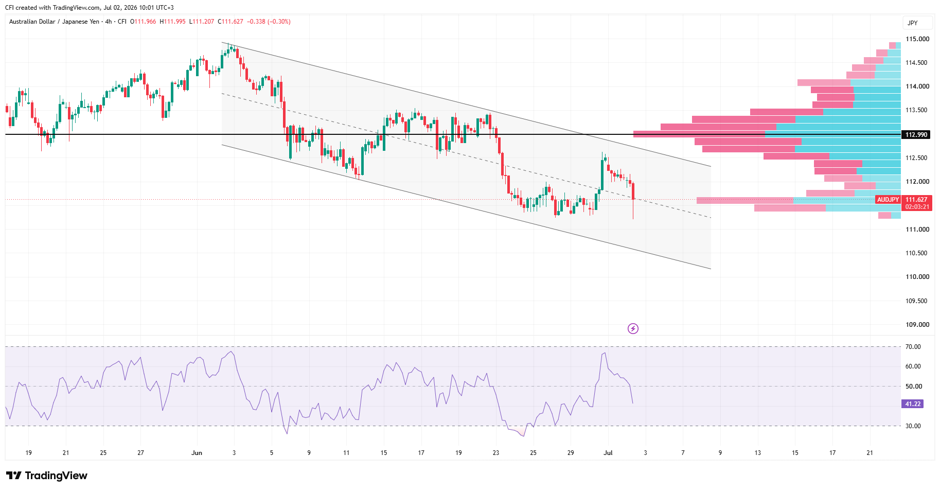 AUDJPY, Time frame: 4H, Source: Trading view
Downtrend Structure Remains Intact
AUDJPY continues to trade within a descending channel, with lower highs and lower lows guiding price action since early June. Recent attempts to recover have repeatedly stalled below channel resistance, leaving the broader bearish structure unchanged.
112.990 Remains the Key Pivot
The 112.990 level continues to stand out as a major structural pivot. The volume profile shows this area coinciding with a significant high-volume node, highlighting it as a zone where substantial trading activity previously occurred. Price remains below this level, and the inability to reclaim it keeps near-term momentum tilted lower.
Price Pressures Lower Channel Region
The pair is currently trading around 111.60, following a failed recovery attempt toward the channel midpoint. Recent candles show renewed selling pressure, pushing price back toward the lower half of the descending structure.
Volume Profile Shows Resistance Overhead
The largest volume is concentrated between 112.50 and 113.50, with the Point of Control centered near 112.990. This suggests that any recovery attempt is likely to encounter resistance within this area unless buying momentum strengthens materially.
RSI Reflects Weakening Momentum
The RSI has retreated to around 40, indicating momentum remains on the bearish side of neutral. While conditions are not yet oversold, the indicator suggests that downside pressure remains and leaves room for further weakness if sellers maintain control. Fundamental Context: Intervention Risk Remains Elevated
A key consideration for AUDJPY is the ongoing sensitivity around Yen weakness. Market participants remain alert to the possibility of Japanese authorities responding to excessive currency moves. While policymakers have avoided defining specific intervention levels, the risk of unexpected action remains part of the broader trading backdrop.
-1791446335.webp)


-1791368114.webp)
-1791359420.webp)